High Available Oracle Access Manager with BIG-F5
http://www.f5.com/pdf/deployment-guides/f5-oracle-oam-dg.pdf
Did this post help you in any way can you please leave a comment? This will motivate me writing more posts.
Showing posts with label Oracle Access Manager. Show all posts
Showing posts with label Oracle Access Manager. Show all posts
Wednesday, August 5, 2009


Wednesday, June 24, 2009
Login Error with error message, Form-Based Authentication for Netpoint/Oblix/CoreId/Oracle Access Manager
When the login of Form-Based Authentication fails because the username/password combination is not correct. The default behavior is the serve the login html page.
But you want to give an error on this page. This can be achieved by putting an Redirection URL with an parameter in the link like this:
/login.jsp?LoginError=True
This should be done in the policy manager:
Default rules - Authentication Rule - Actions - Authentication Failure - Redirection URL.
Did this post help you in any way can you please leave a comment? This will motivate me writing more posts.
But you want to give an error on this page. This can be achieved by putting an Redirection URL with an parameter in the link like this:
/login.jsp?LoginError=True
This should be done in the policy manager:
Default rules - Authentication Rule - Actions - Authentication Failure - Redirection URL.
Did this post help you in any way can you please leave a comment? This will motivate me writing more posts.
Wednesday, May 27, 2009
invalid policy configuration Netpoint/Oblix/CoreId/Oracle Access Manager
If you made a mistake during the configuration of a policy in the policy manager and you locked yourself out of the system it is possible to undo this in the LDAP Directory.
Use an LDAP browser/editor (for example: LDAP browser) to find the entry:
realm
+-o=oblix
+---obapp=PSC
+-----obname=OBAutoSSO_XXXXXXX (find the one you last changed, normally the last created is added at the bottom)
Change the value of the attribute: obenabled from enabled to disabled. Restart the Access Manager and after that it should be possible to log in.
Did this post help you in any way can you please leave a comment? This will motivate me writing more posts.
Use an LDAP browser/editor (for example: LDAP browser) to find the entry:
realm
+-o=oblix
+---obapp=PSC
+-----obname=OBAutoSSO_XXXXXXX (find the one you last changed, normally the last created is added at the bottom)
Change the value of the attribute: obenabled from enabled to disabled. Restart the Access Manager and after that it should be possible to log in.
Did this post help you in any way can you please leave a comment? This will motivate me writing more posts.
Unsuccessfull/incomplete product setup: Howto: restart product setup of Identity Server/Policy Manager, Netpoint/Oblix/CoreId/Oracle Access Manager
If something goes wrong (Empty browser window, no response) during the product setup of the Identity Server/Policy Manager in the browser it is possible to restart the product setup by changing the setup.xml of the product. Set the status Value to incomplete instead of done and you can start over with the product setup.
Location of setup.xml:
WebPass: $WEBPASS_HOME/access/oblix/config
Identity server: $IDENTITY_HOME/identity/oblix/config
Did this post help you in any way can you please leave a comment? This will motivate me writing more posts.
Location of setup.xml:
WebPass: $WEBPASS_HOME/access/oblix/config
Identity server: $IDENTITY_HOME/identity/oblix/config
Did this post help you in any way can you please leave a comment? This will motivate me writing more posts.
Friday, May 8, 2009
IdentityXML change password sample XML, Netpoint/Oblix/CoreId/Oracle Access Manager
With this XML sample it is possible to change the password of an user!
Refer:
http://www.oracle.com/technology/sample_code/products/id_mgmt/accmgr/id_developer.pdf
Did this post help you in any way can you please leave a comment? This will motivate me writing more posts.
<?xml version="1.0"?>
<SOAP-ENV:Envelope xmlns:SOAP-ENV="http://schemas-xmlsoap.org/soap/envelope/"
xmlns:oblix="http://www.oblix.com">
<SOAP-ENV:Body>
<oblix:authentication xmlns:oblix="http://www.oblix.com" type="basic">
<oblix:login>orcladmin</oblix:login>
<oblix:password>[PASSWORD]</oblix:password>
</oblix:authentication>
<oblix:request application="userservcenter" function="modifyUser"> <oblix:params>
<oblix:param name="uid">cn=[USERNAME],cn=users,dc=test,dc=com
</oblix:param>
<oblix:param name="attrName_1">userPassword</oblix:param>
<oblix:param name="attrValue_1">[NEW_PASSWORD]</oblix:param>
<oblix:param name="attrValue_1_confirm">[NEW_PASSWORD]</oblix:param>
<oblix:param name="attrValue_1_old">[OLD_PASSWORD]</oblix:param>
<oblix:param name="attrOperation_1">REPLACE</oblix:param>
<oblix:param name="noOfFields">1</oblix:param>
</oblix:params>
</oblix:request>
</SOAP-ENV:Body>
</SOAP-ENV:Envelope>
Refer:
http://www.oracle.com/technology/sample_code/products/id_mgmt/accmgr/id_developer.pdf
Did this post help you in any way can you please leave a comment? This will motivate me writing more posts.
Thursday, May 7, 2009
IdentityXML example, Netpoint/Oblix/CoreId/Oracle Access Manager
In the project I was working on there was a question to find out how users could change their password without using the GUI of the identity server. An Oracle Sales Consultant pointed me to IdentityXML as a possible solution for this problem. Together with a colleague (JAVA consultant) of IT-eye, Ron Weverwijk we found out how this works.
This blog is a simple description how IdentityXML works and we used the Oracle documentation which you can find at the end of this blog.
In the documentation there is an sample JAVA program which we used:
This program needs a jar file http_client.jar this file can be found in a $ORACLE_HOME of an Oracle Application Server in the directory $ORACLE_HOME/j2ee/home/lib.
First this program needs to be compiled (We used a Linux client)
cd $HOME
mkdir IdentityXML
cd IdentityXML
cp $ORACLE_HOME/j2ee/home/lib/http_client.jar .
vi ObSoapClient.java
Fill this file with the code example.
Compile the java file:
Now you have an ObSoapClient.class file.
All you need to test if it works is an example SOAP messages which can be found in the identity server directory. In this directory are examples of messages which can be used.
$IDENTITY_HOME/identity/oblix/unsupported/integsvcs
For this example we will query the OID for the attribute sn of an user in the OID.
The example used is: um_view.xml
To keep it simple we chosed to use orcladmin as the user in the authentication part of the message. But if you want to use another username a workflow should be created in the identity server which gives the user the privilege to view attributes of other users.
Create an file soap.xml with and fill this with:
Now execute the java program:
Output of the program:
Refer:
http://download.oracle.com/docs/cd/B28196_01/idmanage.1014/b25346/idxmlows.htm
Did this post help you in any way can you please leave a comment? This will motivate me writing more posts.
This blog is a simple description how IdentityXML works and we used the Oracle documentation which you can find at the end of this blog.
In the documentation there is an sample JAVA program which we used:
/**
 * This is a very simple SOAP example of how to invoke Oracle Access Manager
 * through SOAP.
 *
 * This program will make a soap request (send the request in soap.xml)
 * to the argument hostname:port/oblix/apps/corpdir/bin/corpdir.cgi
 *
 * Requirements:
 * *** ObSoapClient, a complete http client library from innovation, is
 *     required to run this test.  The software is free, and licensed under the
 *     GNU Lesser General Public License.
 *     HTTPClient is available at http://www.innovation.ch/java/HTTPClient
 *     This program has been tested with HTTPClient Version 0.3-2
 *
 * To run:
 * *** java ObSoapClient [-h hostname] [-p port] [-f inputfile] [-u oblixurl]
 *
 */

import java.net.URL;
import java.io.IOException;
import java.io.FileReader;
import java.io.BufferedReader;
import HTTPClient.CookieModule;
import HTTPClient.HTTPConnection;
import HTTPClient.HTTPResponse;
import HTTPClient.ModuleException;
import HTTPClient.NVPair;

public class ObSoapClient
{
        static String hostname = "sunlight.oracle.com";
        static String filename = "soap.xml";
        static int port = 80;
        static String oburl = "/identity/oblix/apps/userservcenter/bin/userservcenter.cgi";

        public static void collectArgs(String args[])
        {
                for (int i = 0; i < args.length; i++) {
                        if (args[i].equals("-h") && args.length >= i+1)
                                hostname = args[i+1];
                        else if (args[i].equals("-f") && args.length >= i+1)
                                filename = args[i+1];
                        else if (args[i].equals("-p") && args.length >= i+1)
                                port = Integer.parseInt(args[i+1]);
                        else if (args[i].equals("-u") && args.length >= i+1)
                                oburl = args[i+1];
                        else if (args[i].equals("-h") || args[i].equals("-help")) {
                                System.out.println("Usage: java ObSoapClient [-h hostname] [-p port] [-f filename] [-u oblixurl] \n");
                        }
                }
        }

        /**
   * Read from soap.xml in current directory and return as string.
         */
        public static String getRequestFromFile()
        {
                StringBuffer data = new StringBuffer();
                try {
                        BufferedReader reader = new BufferedReader(new FileReader(filename));

                        for (String line = reader.readLine(); line != null;
                                line = reader.readLine()) {
                                data.append(line);
                                data.append("\r\n");
                        }
                } catch (Exception e) {
                        System.out.println(e.toString());
                }
                return data.toString();
        }

        public static void main(String args[]) throws Exception
        {
                try {
                        CookieModule.setCookiePolicyHandler(null);

                        // initiate connection
                        collectArgs(args);
                        HTTPConnection con = new HTTPConnection(hostname, port);

                        // collect response
                        NVPair header[] = new NVPair[1];
                        header[0] = new NVPair("Content-Type", "text/xml");
                        HTTPResponse rsp =
                                con.Post(oburl,
                                getRequestFromFile(),
                                header);

                        // get status and act accordingly
                        if (rsp.getStatusCode() >= 300) {
                                System.err.println("Received Error: "+rsp.getReasonLine());
                                System.err.println(new String(rsp.getData()));
                        } else
                                System.out.println(new String(rsp.getData()));
                } catch (IOException ioe) {
                        System.err.println(ioe.toString());
                } catch (ModuleException me) {
                        System.err.println("Error handling request: " + me.getMessage());
                } catch (Exception e) {
                        System.out.println(e.toString());
                }
        }

}

/*
        NVPair form_data[] = new NVPair[2];

        form_data[0] = new NVPair("login", "J.Smith");
        form_data[1] = new NVPair("password", "J.Smith");
//      form_data[2] = new NVPair("uid",
//              "cn=John Smith,ou=Corporate,o=Company,c=US");
//      form_data[3] = new NVPair("program", "personPage");
//      form_data[4] = new NVPair("tab_id", "Employees");

//      HTTPResponse rsp = con.Post("/oblix/apps/corpdir/bin/corpdir.cgi", form_data);

*/
This program needs a jar file http_client.jar this file can be found in a $ORACLE_HOME of an Oracle Application Server in the directory $ORACLE_HOME/j2ee/home/lib.
First this program needs to be compiled (We used a Linux client)
cd $HOME
mkdir IdentityXML
cd IdentityXML
cp $ORACLE_HOME/j2ee/home/lib/http_client.jar .
vi ObSoapClient.java
Fill this file with the code example.
Compile the java file:
javac -classpath .:http_client.jar ObSoapClient.java
Now you have an ObSoapClient.class file.
All you need to test if it works is an example SOAP messages which can be found in the identity server directory. In this directory are examples of messages which can be used.
$IDENTITY_HOME/identity/oblix/unsupported/integsvcs
For this example we will query the OID for the attribute sn of an user in the OID.
The example used is: um_view.xml
To keep it simple we chosed to use orcladmin as the user in the authentication part of the message. But if you want to use another username a workflow should be created in the identity server which gives the user the privilege to view attributes of other users.
Create an file soap.xml with and fill this with:
<?xml version="1.0"?>
<SOAP-ENV:Envelope xmlns:SOAP-ENV="http://schemas-xmlsoap.org/soap/envelope/"
                   xmlns:oblix="http://www.oblix.com">
<SOAP-ENV:Body>
     <oblix:authentication xmlns:oblix="http://www.oblix.com" type="basic">
          <oblix:login>orcladmin</oblix:login>
          <oblix:password>[PASSWORD]</oblix:password>
     </oblix:authentication>
     <oblix:request function="view">
          <oblix:params>
               <oblix:param name="uid">cn=[USER_NAME],cn=users,dc=test,dc=com</oblix:param>
               <oblix:param name="attrName">sn</oblix:param>
          </oblix:params>
     </oblix:request>
</SOAP-ENV:Body>
</SOAP-ENV:Envelope>
Now execute the java program:
java -classpath http_client.jar:. ObSoapClient -f soap.xml -h [HOSTNAME] -p [HTTP_PORT] -u /identity/oblix/apps/userservcenter/bin/userservcenter.cgi
Output of the program:
<?xml version="1.0" encoding="utf-8"?>
<SOAP-ENV:Envelope xmlns:SOAP-ENV="http://schemas.xmlsoap.org/soap/envelope/">
<SOAP-ENV:Body>
<Oblix xmlns:oblix="http://www.oblix.com/" xmlns="http://www.oblix.com/" oblang="en-us">
<ObProfile>
<ObPanel obname="defaultPanel" obpanelId="20090504T03484759854" obpanelClass="inetorgperson">
<ObAttribute obattrName="sn">
<ObDisplay obdisplayName="Last Name" obdisplayType="textS" obname="sn" obmode="view" obcanRequest="false" obrequired="false">
<ObTextS>
<ObValue>[LASTNAME]</ObValue>
</ObTextS>
</ObDisplay>
</ObAttribute>
</ObPanel>
<ObHeaderPanel></ObHeaderPanel>
<ObRequestInfo>158720928</ObRequestInfo>
<ObScripts>
<ObScript obname="../../../lang/en-us/msgctlg.js"></ObScript>
<ObScript obname="../../../lang/shared/i18n.js"></ObScript>
<ObScript obname="../../../lang/shared/nsiesetup.js"></ObScript>
<ObScript obname="../../../lang/shared/misc.js"></ObScript>
<ObScript obname="../../../lang/shared/miscsc.js"></ObScript>
<ObScript obname="../../../lang/shared/horizontalprofile.js"></ObScript>
<ObScript obname="../../../lang/shared/userservcenter.js"></ObScript>
</ObScripts>
<ObForm obname="profileForm" obmethod="post" obaction="userservcenter.cgi?tab_id=Employees&uid=cn%3D[USERNAME]%2Ccn%3Dusers%2Cdc%3Dtest%2Cdc%3Dcom%2C">
<ObInput obtype="hidden" obname="program" obvalue="view"></ObInput>
<ObInput obtype="hidden" obname="visiblePanel"></ObInput>
</ObForm>
<ObDisplay obdisplayName="ObTextMessage" obdisplayType="textS" obname="ObTextMessage" obmode="view" obcanRequest="false" obrequired="false">
<ObTextS>
<ObTextMessage></ObTextMessage>
</ObTextS>
</ObDisplay>
<ObTextMessage></ObTextMessage>
<ObSelectorInfoForm>
<ObForm obname=""></ObForm>
</ObSelectorInfoForm>
<ObButton obaction="initiateDeactivateUser"></ObButton>
<ObButton obaction="userreactivate"></ObButton>
<ObButton obaction="wfTicketDelete"></ObButton>
<ObButton obaction="userModify" obimageUrl="NAVmodify" obmouseOver="Modify this profile." obhref="../../userservcenter/bin/userservcenter.cgi?program=modify&tab_id=Employees&uid=cn%3D[USERNAME]%2Ccn%3Dusers%2Cdc%3Dtest%2Cdc%3Dcom"></ObButton>
<ObStatus>0</ObStatus>
</ObProfile>
<ObStatus>0</ObStatus>
</Oblix>
</SOAP-ENV:Body>
</SOAP-ENV:Envelope>
Refer:
http://download.oracle.com/docs/cd/B28196_01/idmanage.1014/b25346/idxmlows.htm
Did this post help you in any way can you please leave a comment? This will motivate me writing more posts.
Friday, April 10, 2009
Documentation, Netpoint/Oblix/CoreId/Oracle Access Manager
Documentation Library Oracle Access Manager:
http://download-uk.oracle.com/docs/cd/B28196_01/index.htm
Oracle® Application Server Best Practices Guide
http://download-uk.oracle.com/docs/cd/B28196_01/core.1014/b31762/accessmgr.htm
Oracle® Access Manager Access Administration Guide
http://download-uk.oracle.com/docs/cd/B28196_01/idmanage.1014/b25990/v2config.htm#BHADBAGE
Did this post help you in any way can you please leave a comment? This will motivate me writing more posts.
http://download-uk.oracle.com/docs/cd/B28196_01/index.htm
Oracle® Application Server Best Practices Guide
http://download-uk.oracle.com/docs/cd/B28196_01/core.1014/b31762/accessmgr.htm
Oracle® Access Manager Access Administration Guide
http://download-uk.oracle.com/docs/cd/B28196_01/idmanage.1014/b25990/v2config.htm#BHADBAGE
Did this post help you in any way can you please leave a comment? This will motivate me writing more posts.
Tuesday, April 7, 2009
"Address already in use: make_sock: could not bind to address 127.0.0.1 port 7200", Netpoint/Oblix/CoreId/Oracle Access Manager
When in the error log of the HTTP_Server ($ORACLE_HOME/Apache/Apache/logs/error_log.xxxxx) this error occures:
Some processes of the HTTP_Server are still running and need to be killed.
[Thu Mar 12 16:16:18 2009] [crit] (98)Address already in use: make_sock: could not bind to address 127.0.0.1 port 7200
Some processes of the HTTP_Server are still running and need to be killed.
"*** glibc detected *** realloc(): invalid size: 0x081a61f8 ***", Netpoint/Oblix/CoreId/Oracle Access Manager
After the installation of the Access Server component of Oracle Access Manager the HTTP_Server needs to be restarted.
It is possible that the following error occures:
This can be solved by changing the httpd.conf file:
exclude two modules:
It is possible that the following error occures:
[Mon Feb 16 14:42:44 2009] [warn] pid file $ORACLE_HOME/Apache/Apache/logs/httpd.pid overwritten -- Unclean shutdown of previous Apache run?
*** glibc detected *** realloc(): invalid size: 0x081a61f8 ***
This can be solved by changing the httpd.conf file:
exclude two modules:
#LoadModule perl_module libexec/libperl.so
#LoadModule php4_module libexec/libphp4.so
Invalid Credentials Error OAM After Applying 10.1.4.3 Patchset to OID
After applying patchset 10.1.4.3 to the OID, Login to Oracle Access Manager (OAM) access server/identity server/ policy manager fails with invalid credentials.
Applying OID 10.1.4.3 patchset modifies the OID attribute orclinmemfiltprocess. The new value is not correct and causes the described problem.
Execute the following query in the OID
For OID 10.1.4.3
Refers: metalink note: 558040.1
Applying OID 10.1.4.3 patchset modifies the OID attribute orclinmemfiltprocess. The new value is not correct and causes the described problem.
Execute the following query in the OID
For OID 10.1.4.3
$ORACLE_HOME/bin/ldapmodify –h <OID_HOST> -p <OID_PORT> –D cn=orcladmin –w <PASSWORD> -v <EOF
dn: cn=dsaconfig,cn=configsets,cn=oracle internet directory
changetype: modify
replace: orclinmemfiltprocess
orclinmemfiltprocess:(|(!(obuseraccountcontrol=*))(obuseraccountcontrol=activated))
orclinmemfiltprocess:(|(obuseraccountcontrol=activated)(!(obuseraccountcontrol=*)))
orclinmemfiltprocess:(obapp=groupservcenter)(!(obdynamicparticipantsset=*))
orclinmemfiltprocess:(objectclass=oblixworkflowinstance)
orclinmemfiltprocess:(objectclass=inetorgperson)
orclinmemfiltprocess:(objectclass=oblixorgperson)
orclinmemfiltprocess:(objectclass=oblixworkflowstepinstance)
EOF
Refers: metalink note: 558040.1
Migration has failed. Please try to manually run the migration program by invoking
Error during text based Installation of the Dutch Language Pack for Identity server on RedHat Linux
./Oracle_Access_Manager10_1_4_0_1_NL_linux_LP_Identity_System
Migrating language...
Made an SR by Oracle Support and the solution to this problem is starting the installation with the -gui option.
./Oracle_Access_Manager10_1_4_0_1_NL_linux_LP_Identity_System
Migrating language...
Migration has failed. Please try to manually run the migration program by
invoking
$ORACLE_ACCESS_MANAGER/identity/oblix/tools/migration_tools/start_obmigratenp
-c LP -f ERROR: could not read property fromMigrationVersion for bean
dsInfoInputbecause the following error occurred:
java.lang.NullPointerExceptionERROR: could not read property
fromFirstMinorVersion for bean dsInfoInputbecause the following error occurred:
java.lang.NullPointerException -t 1014 -s "ERROR: could not read property
destination for bean backupOblixDirBeanbecause the following error occurred:
java.lang.NullPointerException" -d "/appl/oracle/ident_10.1.4/identity" -i
"$ORACLE_ACCESS_MANAGER/identity".
Made an SR by Oracle Support and the solution to this problem is starting the installation with the -gui option.
Monday, April 6, 2009
Form-Based Authentication Single Sign On for Oracle SOA suite 10.1.3.x ESB console, Netpoint/Oblix/CoreId/Oracle Access Manager
1. Configure ESB console with OAM
see my post CoreId/Oracle Access Manager Form-Based Authentication for J2EE application)
All the files that need to be changed are located in $ORACLE_HOME/j2ee/oc4j_soa/*
1.1 system-jazn-config.xml
Change the system-jazn-config.xml see Chapter 3.5 of my post CoreId/Oracle Access Manager Form-Based Authentication for J2EE application
The application name should be: esb
1.2 orion-application.xml
Change the orion-application.xml files in both directories: (applications and application-deployments) see Chapter 3.3 of my post CoreId/Oracle Access Manager Form-Based Authentication for J2EE application.
Replace this code:
By this code:
1.3 web.xml
Change the web.xml see Chapter 3.1 of my post CoreId/Oracle Access Manager Form-Based Authentication for J2EE application.
Location:
/appl/oracle/soa_10.1.3/j2ee/oc4j_soa/applications/esb-dt/esb_console/WEB-INF
In the web.xml the following code must be replaced:
Replace by:
1.4 opmn.xml
Change the opmn.xml see Chapter 2.1 of my post CoreId/Oracle Access Manager Form-Based Authentication for J2EE application.
1.5 Policy Domain
Configure a policy domain for /em see Chapter 3.4 of my post CoreId/Oracle Access Manager Form-Based Authentication for J2EE application.
The only difference is that /esb needs to be protected instead of: /callerInfo/callerInfoB
see my post CoreId/Oracle Access Manager Form-Based Authentication for J2EE application)
All the files that need to be changed are located in $ORACLE_HOME/j2ee/oc4j_soa/*
1.1 system-jazn-config.xml
Change the system-jazn-config.xml see Chapter 3.5 of my post CoreId/Oracle Access Manager Form-Based Authentication for J2EE application
The application name should be: esb
1.2 orion-application.xml
Change the orion-application.xml files in both directories: (applications and application-deployments) see Chapter 3.3 of my post CoreId/Oracle Access Manager Form-Based Authentication for J2EE application.
Replace this code:
<jazn provider="XML" location="../../config/system-jazn-data.xml" default-realm="jazn.com" jaas-mode="doAsPrivileged" />
By this code:
<jazn provider="XML" default-realm="jazn.com" jaas-mode="doAsPrivileged">
   <jazn-web-app auth-method="COREIDSSO"/>
</jazn>
1.3 web.xml
Change the web.xml see Chapter 3.1 of my post CoreId/Oracle Access Manager Form-Based Authentication for J2EE application.
Location:
/appl/oracle/soa_10.1.3/j2ee/oc4j_soa/applications/esb-dt/esb_console/WEB-INF
In the web.xml the following code must be replaced:
    <login-config>
                <auth-method>FORM</auth-method>
                <form-login-config>
                        <form-login-page>/login.jsp</form-login-page>
                        <form-error-page>/login_error.jsp</form-error-page>
                </form-login-config>
  </login-config>
Replace by:
    <login-config>
        <realm-name>ascontrol</realm-name>
    </login-config>
1.4 opmn.xml
Change the opmn.xml see Chapter 2.1 of my post CoreId/Oracle Access Manager Form-Based Authentication for J2EE application.
1.5 Policy Domain
Configure a policy domain for /em see Chapter 3.4 of my post CoreId/Oracle Access Manager Form-Based Authentication for J2EE application.
The only difference is that /esb needs to be protected instead of: /callerInfo/callerInfoB
Form-Based Authentication Single Sign On for Oracle SOA suite 10.1.3.x asconsole, Netpoint/Oblix/CoreId/Oracle Access Manager
I will explain how SSO / OAM / Oracle SOA suite 10.1.3 asconsole can be configured.
1. Configure asconsole with OAM /em
First I will configure the asconsole, this is very easy. Before you can start configuring you need to create the user and groups in the OID this can be achieved with a trick.
1.1 Add User and Groups in the OID
Log in on the asconsole of the SOA suite with the oc4jadmin user:
http://hostname:port/em
Click on the home container > tab Administration > Identity Management
Fill in the OID settings of your OID, then automaticly the users and groups are added to the OID.
After this it is easy (see my post CoreId/Oracle Access Manager Form-Based Authentication for J2EE application)
All the files that need to be changed are located in the directory: $ORACLE_HOME/j2ee/home/*
1.2 system-jazn-config.xml
Change the system-jazn-config.xml see Chapter 3.5 of my post CoreId/Oracle Access Manager Form-Based Authentication for J2EE application
The application name should be: asconsole
1.3 orion-application.xml
Change the orion-application.xml files in both directories: (applications and application-deployments) see Chapter 3.3 of my post CoreId/Oracle Access Manager Form-Based Authentication for J2EE application.
Replace this code:
By the following code:
1.3 web.xml
Change the web.xml see Chapter 3.1 of my post CoreId/Oracle Access Manager Form-Based Authentication for J2EE application.
In the web.xml the following code must be replaced:
Replace by:
1.4 opmn.xml
Change the opmn.xml see Chapter 2.1 of my post CoreId/Oracle Access Manager Form-Based Authentication for J2EE application.
1.5 Policy Domain
Configure a policy domain for /em see Chapter 3.4 of my post CoreId/Oracle Access Manager Form-Based Authentication for J2EE application.
The only difference is that /em needs to be protected instead of: /callerInfo/callerInfoB
1. Configure asconsole with OAM /em
First I will configure the asconsole, this is very easy. Before you can start configuring you need to create the user and groups in the OID this can be achieved with a trick.
1.1 Add User and Groups in the OID
Log in on the asconsole of the SOA suite with the oc4jadmin user:
http://hostname:port/em
Click on the home container > tab Administration > Identity Management
Fill in the OID settings of your OID, then automaticly the users and groups are added to the OID.
After this it is easy (see my post CoreId/Oracle Access Manager Form-Based Authentication for J2EE application)
All the files that need to be changed are located in the directory: $ORACLE_HOME/j2ee/home/*
1.2 system-jazn-config.xml
Change the system-jazn-config.xml see Chapter 3.5 of my post CoreId/Oracle Access Manager Form-Based Authentication for J2EE application
The application name should be: asconsole
1.3 orion-application.xml
Change the orion-application.xml files in both directories: (applications and application-deployments) see Chapter 3.3 of my post CoreId/Oracle Access Manager Form-Based Authentication for J2EE application.
Replace this code:
    <!-- %BEGINGOVERNSSO%

    <jazn provider="XML">
        <jazn-web-app auth-method="CUSTOM_AUTH"/>
    </jazn>

    %ENDGOVERNSSO% -->
By the following code:
<jazn provider="XML" default-realm="jazn.com" jaas-mode="doAsPrivileged">
   <jazn-web-app auth-method="COREIDSSO"/>
</jazn>
1.3 web.xml
Change the web.xml see Chapter 3.1 of my post CoreId/Oracle Access Manager Form-Based Authentication for J2EE application.
In the web.xml the following code must be replaced:
  <login-config>
    <auth-method>FORM</auth-method>
    <realm-name>ascontrol</realm-name>
    <form-login-config>
      <form-login-page>/console/logon</form-login-page>
      <form-error-page>/logon_failed.html</form-error-page>
    </form-login-config>
  </login-config>
Replace by:
    <login-config>
        <realm-name>ascontrol</realm-name>
        <auth-method>BASIC</auth-method>
    </login-config>
1.4 opmn.xml
Change the opmn.xml see Chapter 2.1 of my post CoreId/Oracle Access Manager Form-Based Authentication for J2EE application.
1.5 Policy Domain
Configure a policy domain for /em see Chapter 3.4 of my post CoreId/Oracle Access Manager Form-Based Authentication for J2EE application.
The only difference is that /em needs to be protected instead of: /callerInfo/callerInfoB
Wednesday, March 25, 2009
Form-Based Authentication for J2EE application, Netpoint/Oblix/CoreId/Oracle Access Manager
This blog describes the steps which are needed to configure OAM/CoreId 10.1.4.2 with a sample J2EE application with Form-Based Authentication on Oracle Application Server 10.1.3 (Oracle HTTP Server 1.x)
Download the sample application callerInfo from the Oracle Website http://www.oracle.com/technology/sample_code/tech/java/codesnippet/security/jaznldap/JAZNLDAP.zip.
Install Oracle Access Manager components.
Install an Oracle Application Server for example 10.1.3.1 (Oracle HTTP Server 1.x/Apache 1.3.x)
Install WebGate 10.1.4.2 BP03 (THIS IS VERY IMPORTANT, there are some important bug fixes in BP03 WebGate see metalink note: 736372.1 for version / patchsets)
Install AccessGate 10.1.4.2 BP06 (THIS IS VERY IMPORTANT, there are some important bug fixes in BP06 AccessGate see metalink note: 736372.1 for version / patchsets)
Create an OC4J container and deploy the callerInfo.ear file.
Create users en groups in the OID:
http://www.oracle.com/technology/sample_code/tech/java/codesnippet/security/jaznldap/UsingDAS.html
1. Configure Oracle Access Manager
1. Configure Oracle Access Manager Form-Based Authentication
2. Configure Oracle Access Manager Basic Authentication
3. Configure the Resource Type
4. Protect the Action URL
1.1 Configure Oracle Access Manager Form-Based Authentication
For Single Sign-On functionality, a form-based authentication scheme must protect the resources.
1.1.1 Create a Login Form
The login form can be a very simple HTML page with an FORM in the page
- The action of the form can be an bogus link (in this example /oam/access/test.html) but this must be the same as in the authentication scheme which is created later on.
- The userid and password can be chosen freely but these will also be used in the authentication sheme.
login1.html
This login1.html file can be placed in $ORACLE_HOME/Apache/Apache/htdocs/public.
1.1.2 Define Form-Based Authentication in Policy Manager
Go to the Access Manager GUI: http://hostname:port/access/oblix and click the Access System Console link, login with the administrator account.
Access System Console > Access System Configuration > Authentication Management
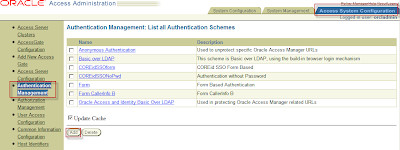
Click button Add to create an Form Based Authentication.
Fill in the entries like this:
(pay attention:
Name: COREidSSOform (choose freely)
Description: COREid SSO Form Based (choose freely)
Level: 1
Challenge Method: Form
Challenge Parameter: form: /public/login1.html (see the location in step 1.1.1)
creds: userid password (use the same variable names as in the login1.html in step 1.1.1)
action: /oam/access/test.html (use the same action as in the login1.html in step 1.1.1)
passthrough: No
SSL Required: No
Challenge Redirect Enabled: Yes
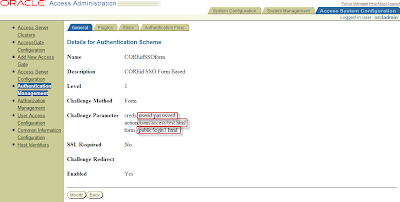
1.1.3 Configure the credential_mapping Plug-In for Form-Based Authentication
Now you have to configure the credential_mapping plugin_in for form-based authentication.
Click on tab plugin and click the button add.
First configure the credential_mapping (this is important, if password is the first plugin it will not work) select the plugin in the drop down box.
For Plugin Parameters:
The value for uid must match the variable specified for user name in the login1.html form and in the creds part of the Form Based Authentication.
This also corresponds to the value of the coreid.name.attribute option in the Oracle Access Manager login module configuration in OC4J.
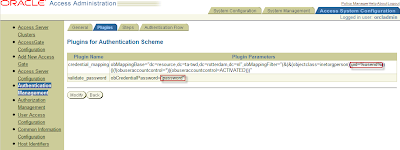
1.1.4 Configure the validate_password Plug-In for Form-Based Authentication
Now configure the validate_password plug-in select validate_password in the drop down box.
The Plugin Parameters:
The value for obCredentialPassword must match the variable specified for password in the login1.html form and in the creds part of the Form Based Authentication.
This also corresponds to the value of the coreid.password.attribute option in the Oracle Access Manager login module configuration.
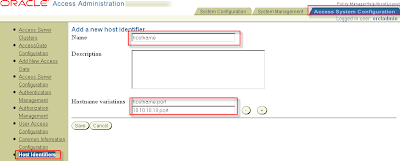
1.1.5 Create Host Identifier
Access System Configuration > Host Identifiers
Click Add
Name: Hostname
Description: (Choose freely)
Hostname variations: hostname:port
ip address:port
1.2 Configure Oracle Access Manager Basic Authentication
You must configure the Oracle Access Manager basic authentication scheme, which must not be password protected (only credential_mapping plug-in). This scheme will protect two resources
- A URL assouciated with resource type (myresourcetype). The Oracle Access Manager
login module will use this URL to communicate to the Access Server through the
Access Manager SDK.
- The Action URL in the login1.html (/oam/access/test.html) page. This is so submitted form requests can be
intercepted by WebGate in order to enforce rules for submitted credentials.
However the application itself must be protected by form-based authentication (steps 1.1.1 and 1.1.2)
1.2.1 Define Basic Authentication in Policy Manager
Go to the Access Manager GUI: http://hostname:port/access/oblix and click the Access System Console link, login with the administrator account.
Access System Console > Access System Configuration > Authentication Management
Click button Add to create Basic Authentication.
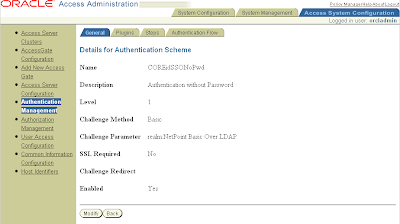
Fill in the entries like this:
(pay attention:
Name: COREidSSONoPwd (choose freely)
Description: Authentication without Password (choose freely)
Level: 1
Challenge Method: Basic
Challenge Parameter: realm:NetPoint Basic Over LDAP
SSL Required: No
Challenge Redirect
Enabled: Yes
1.2.2 Configure the credential_mapping Plug-In for Basic Authentication
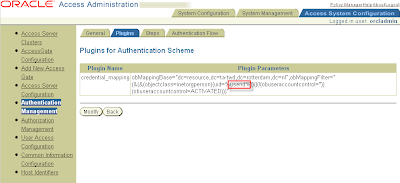
Now you have to configure the credential_mapping plugin_in for form-based authentication.
Click on tab plugin and click the button add.
First configure the credential_mapping (this is important, if password is the first plugin it will not work) select the plugin in the drop down box.
For Plugin Parameters:
The value for uid must match the variable specified for user name in the login1.html form and in the creds part of the Form Based Authentication.
This also corresponds to the value of the coreid.name.attribute option in the Oracle Access Manager login module configuration.
1.3 Configure the Resource Type
In Oracle Access Manager, a resource type describes the kind of resource to be protected, including its associated operations. Operations associated with a resource are tied to its type. You must configure an Oracle Access Manager resource type for your resource, and then protect your resource type, action URL, and application.
The Oracle Access Manager login module will need information for the resource type, as will be noted. OC4J uses the resource type to retrieve user information based on the Oracle Access Manager ObSSOCookie or the user name, using APIs of the Access Manager SDK.
1.3.1 Configure the Name and Operation of the Resource Type
Access System Console > Access System Configuration > Common Information Configuration > Resource Type Definitions
On the page that lists all resource types, choose to add a new resource type.
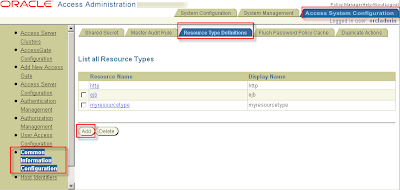
Make entries such as the following to define a new resource type:
Resource Name: myresourcetype (choose freely)
Display Name: myresourcetype (choose freely)
Resource Matching: Case Insensitive
Resource Operation: MYRESOURCEOPERATRION (choose freely)
You can choose any names for the resource type and resource operation, but you must use the same names for the coreid.resource.type and coreid.resource.operation option values in the Oracle Access Manager login module configuration.
1.3.2 Configure and Protect the URL of the Configured Resource Type
After authentication, OC4J requires access to the user's roles in order to check for authorization. To enable this, you must set up an Oracle Access Manager "return action" that allows Oracle Access Manager to return the appropriate roles to OC4J for the user after successful authentication.
To set up the return action in Oracle Access Manager, navigate as follows:
Policy Manager > Create Policy Domain
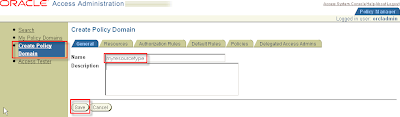
Policy Manager > My Policy Domains > myresourcetype > tab Resources
Create Resource for myresource type
Click button Add
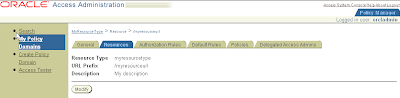
Resource Type: myresourcetype (step 3.1)
Host Identifiers: hostname (step 1.5)
URL Prefix: /myresourceurl (choose freely)
Description: (choose freely)
Button Save
The URL prefix must start with a "/" and is the designated URL of the resource type. This must match the value of the coreid.resource.name option in the Oracle Access Manager login module configuration.
1.3.3 Configure the Return Action Attributes
After authentication, OC4J requires access to the user's roles in order to check for authorization. To enable this, you must set up an Oracle Access Manager "return action" that allows Oracle Access Manager to return the appropriate roles to OC4J for the user after successful authentication.
To set up the return action in Oracle Access Manager, navigate as follows:
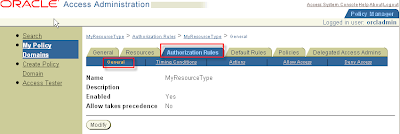
Policy Manager > My Policy Domains > MyResourceType > Authorization Rules tab
Click button Add
Name: MyResourceType (choose freely)
Description (choose freely)
Enabled Yes
Allow takes precedence No
Click button Save
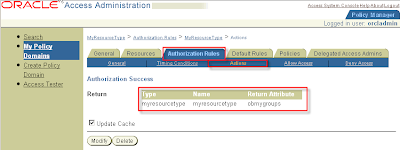
Under the Authorization Success tab section, add the following entries (continuing the preceding example using myresourcetype):
Return Type: myresourcetype
Return Name: myresourcetype
Return Attribute: ObMyGroups
1.4 Protect the Action URL
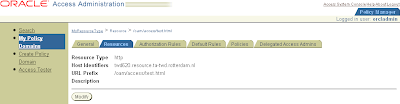
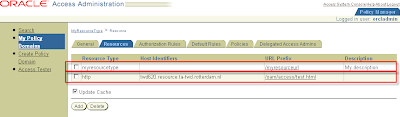
Create Resource for http type action url (/oam/access/test.html)
Policy Manager > My Policy Domains > myresourcetype > tab Resources
Create Resource for myresource type
Click button Add
Resource Type http
Host Identifiers hostname (step 1.5)
URL Prefix /oam/access/test.html action URL in login1.html
Description (choose freely)
IMPORTANT:
Do not forget to enable the policy:
My Policy Domains > MyResourceType > General
Click modify
Set Enable to Yes and click save.
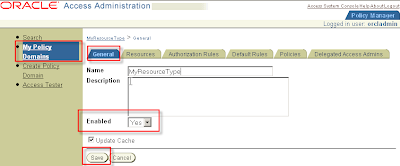
Overview:
2. Configure OC4J with the Access Manager SDK
After that the SDK is installed the SDK needs be registered against the Access Server and the already installed WebGate. Pay attention the order of configuring is important. First the Access Server then the WebGate.
Configure SDK against Access Server:
Go to the directory
cd SDK_HOME/AccessServerSDK/oblix/tools/configureAccessGate
Output:
Configure SDK against WebGate:
Output:
2.1 Configure the Access Manager SDK to Each OC4J Instance
You will need Oracle Access Manager SDK, one installation for each OC4J instance, on the same system as OC4J. The Access Manager SDK is required by OC4J at runtime to communicate with Access Server. OC4J must be given the Access Manager SDK location during startup (through the java.library.path property), so that it can initialize the SDK. Note this initialization occurs only if at least one application is using Oracle Access Manager as the security provider.
2.1.1 Copy jobaccess
Copy the Oracle Access Manager file jobaccess.jar from the Access Manager SDK to the OC4J path. You will find this file in the SDK_HOME/AccessServerSDK/oblix/lib directory. Create the directory ORACLE_HOME/j2ee/home/lib/ext (if it does not already exist) and copy the jobaccess.jar to that directory.
2.2 Configure the Access Manager SDK Library Path for Each OC4J Instance
Configuring opmn.xml for Oracle Access Manager
Where OC4J is managed by OPMN, add settings to opmn.xml for Oracle HTTP Server and OC4J, as follows, when you use Oracle Access Manager:
1. Set the LD_ASSUME_KERNEL environment variable to the value "2.4.19".
2. Set the LD_LIBRARY_PATH environment variable to point to the AccessServerSDK library path.
3. Add the AccessServerSDK library path to java.library.path as a start parameter.
Then restart the OC4J instances.
Following is an opmn.xml example for the OC4J home instance. Repeat these settings for the OC4J_SOA instance and any other OC4J instances as appropriate:
3. Configure the CallerInfo Application
3.1 Protect the Application URL's in web.xml
The first step in protecting your application is to protect appropriate URLs or URL prefixes through settings in the web.xml file, using standard J2EE features.
These are the same URLs that you will you protect through Oracle Access Manager.
And add the following code:
3.2 Settings for Application Deployment
In Oracle Application Server 10.1.3.x implementations, Application Server Control does not yet support Oracle Access Manager as a security provider. When you deploy your application using the Application Server Control Console, choose the file-based provider. This will be overridden through the configuration steps documented in this blog.
3.3 Configure Oracle Access Manager SSO in orion-application.xml
To use Oracle Access Manager Single Sign-On as the authentication method for Web applications, set the auth-method attribute to "COREIDSSO" in the element in the OC4J orion-application.xml files ($ORACLE_HOME/j2ee/CONTAINER_NAME/applications and in $ORACLE_HOME/j2ee/CONTAINER_NAME/application-deployments). You can do this as either a pre-deployment step (packaged in the EAR file) or a post-deployment step.
You also need to add the mapping between de application role and the OID group:
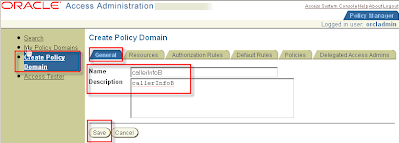
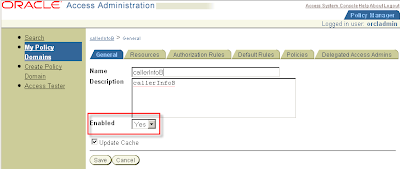
3.4 Protect the Application URL's in Oracle Access Manager
Policy Manager > Create Policy Domain
Name : callerInfoB
Description: callerInfoB
Click button save
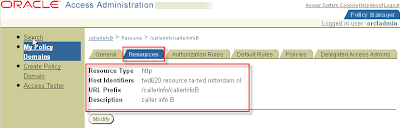
Tab Resources
Resource Type http
Host Identifiers hostname
URL Prefix /callerInfo/callerInfoB
Description caller info B (choose freely)
Click button Save
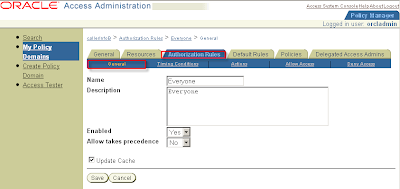
Tab Authorisation Rules > SubTab General
Name Everyone (choose freely)
Description Everyone (choose freely)
Enabled Yes
Allow takes precedence No
Click Save
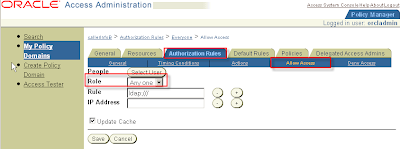
Tab Authorisation Rules > SubTab Allow Access
Role Any one
Click Save
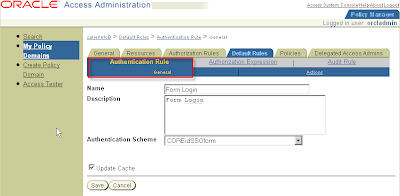
Tab Default Rules > SubTab Authentication Rule > SubSubTab General
Name: Form Login
Description: Form Login
Authentication Scheme: COREidSSOform
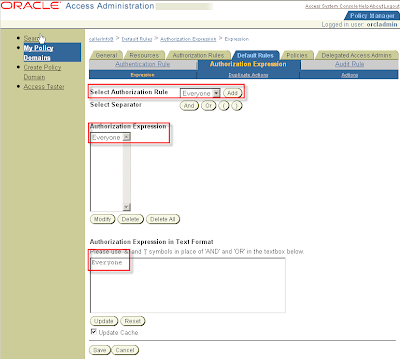
Tab Default Rules > SubTab Authorization Expression > SubSubTab Expression
Select Authorization Rule: Everyone
Click button Add > Click button Save
IMPORTANT:
Do not forget to enable the policy:
My Policy Domains > CallerInfoB > General
Click modify
Set Enable to Yes and click save.
3.5 Configure the Oracle Access Manager Login Module
For a Web application, the OC4J implementation to support Oracle Access Manager requires the login module CoreIDLoginModule, supplied by Oracle. The following template shows the general form of the configuration, in the system-jazn-data.xml file.
$ORACLE_HOME/j2ee/CONTAINER_NAME/config/system-jazn-data.xml
3.6 Test the application
WebGate will intercept this request and will check the authentication scheme for this URL. The configuration shown earlier in this chapter will result in the user being prompted with the login.html login form from "Create a Login Form". Then the following sequence will take place:
1. WebGate will capture the user name and password from the login form and communicate to Access Server.
2. Access Server will communicate to Oracle Internet Directory (or other LDAP repository that you use).
3. After the user is authenticated, the Oracle Access Manager SSO token will be returned to WebGate.
4. WebGate will set the ObSSOCookie and pass the cookie and other HTTP headers to mod_oc4j, which will route the request to the appropriate OC4J instance.
5. OC4J will take the cookie and validate it, or retrieve roles for the user associated with this cookie from Access Server using the Access Manager SDK configured on OC4J.
http://hostname:port/callerInfo
Application:
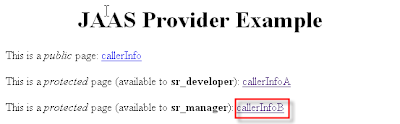
Click on the link for managers: callerInfoB
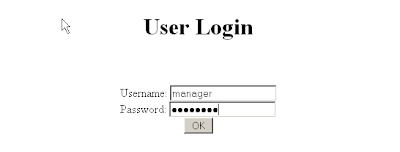
Login screen (login1.html):
Login as manager/password
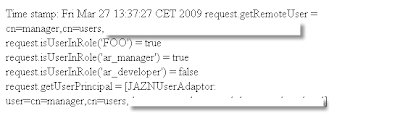
Application shows roles:
Refers:
http://download.oracle.com/docs/cd/B31017_01/web.1013/b28957/coreid.htm#BJEBJCCF
Did this post help you in any way can you please leave a comment? This will motivate me writing more posts.
Download the sample application callerInfo from the Oracle Website http://www.oracle.com/technology/sample_code/tech/java/codesnippet/security/jaznldap/JAZNLDAP.zip.
Install Oracle Access Manager components.
Install an Oracle Application Server for example 10.1.3.1 (Oracle HTTP Server 1.x/Apache 1.3.x)
Install WebGate 10.1.4.2 BP03 (THIS IS VERY IMPORTANT, there are some important bug fixes in BP03 WebGate see metalink note: 736372.1 for version / patchsets)
Install AccessGate 10.1.4.2 BP06 (THIS IS VERY IMPORTANT, there are some important bug fixes in BP06 AccessGate see metalink note: 736372.1 for version / patchsets)
Create an OC4J container and deploy the callerInfo.ear file.
Create users en groups in the OID:
http://www.oracle.com/technology/sample_code/tech/java/codesnippet/security/jaznldap/UsingDAS.html
1. Configure Oracle Access Manager
1. Configure Oracle Access Manager Form-Based Authentication
2. Configure Oracle Access Manager Basic Authentication
3. Configure the Resource Type
4. Protect the Action URL
1.1 Configure Oracle Access Manager Form-Based Authentication
For Single Sign-On functionality, a form-based authentication scheme must protect the resources.
1.1.1 Create a Login Form
The login form can be a very simple HTML page with an FORM in the page
- The action of the form can be an bogus link (in this example /oam/access/test.html) but this must be the same as in the authentication scheme which is created later on.
- The userid and password can be chosen freely but these will also be used in the authentication sheme.
login1.html
<HTML>
<HEAD>
</HEAD>
<body>
<center>
<h1>User Login</h1>
<br>
<br>
<form name="myForm" action="/oam/access/test.html" method="post">
Username: <input type="text" name="userid" width="20"><br />
Password: <input type="password" name="password" width="20"><br />
<input type="submit" value="OK">
</form>
</body>
<html>
This login1.html file can be placed in $ORACLE_HOME/Apache/Apache/htdocs/public.
1.1.2 Define Form-Based Authentication in Policy Manager
Go to the Access Manager GUI: http://hostname:port/access/oblix and click the Access System Console link, login with the administrator account.
Access System Console > Access System Configuration > Authentication Management

Click button Add to create an Form Based Authentication.
Fill in the entries like this:
(pay attention:
Name: COREidSSOform (choose freely)
Description: COREid SSO Form Based (choose freely)
Level: 1
Challenge Method: Form
Challenge Parameter: form: /public/login1.html (see the location in step 1.1.1)
creds: userid password (use the same variable names as in the login1.html in step 1.1.1)
action: /oam/access/test.html (use the same action as in the login1.html in step 1.1.1)
passthrough: No
SSL Required: No
Challenge Redirect Enabled: Yes

1.1.3 Configure the credential_mapping Plug-In for Form-Based Authentication
Now you have to configure the credential_mapping plugin_in for form-based authentication.
Click on tab plugin and click the button add.
First configure the credential_mapping (this is important, if password is the first plugin it will not work) select the plugin in the drop down box.
For Plugin Parameters:
obMappingBase="cn=users,dc=us,dc=oracle,dc=com",obMappingFilter="(&(&
(objectclass=inetorgperson)(uid=%userid%))(|(!
(obuseraccountcontrol=*)) (obuseraccountcontrol=ACTIVATED)))"
The value for uid must match the variable specified for user name in the login1.html form and in the creds part of the Form Based Authentication.
This also corresponds to the value of the coreid.name.attribute option in the Oracle Access Manager login module configuration in OC4J.
1.1.4 Configure the validate_password Plug-In for Form-Based Authentication
Now configure the validate_password plug-in select validate_password in the drop down box.
The Plugin Parameters:
obCredentialPassword="password"
The value for obCredentialPassword must match the variable specified for password in the login1.html form and in the creds part of the Form Based Authentication.
This also corresponds to the value of the coreid.password.attribute option in the Oracle Access Manager login module configuration.

1.1.5 Create Host Identifier
Access System Configuration > Host Identifiers
Click Add
Name: Hostname
Description: (Choose freely)
Hostname variations: hostname:port
ip address:port

1.2 Configure Oracle Access Manager Basic Authentication
You must configure the Oracle Access Manager basic authentication scheme, which must not be password protected (only credential_mapping plug-in). This scheme will protect two resources
- A URL assouciated with resource type (myresourcetype). The Oracle Access Manager
login module will use this URL to communicate to the Access Server through the
Access Manager SDK.
- The Action URL in the login1.html (/oam/access/test.html) page. This is so submitted form requests can be
intercepted by WebGate in order to enforce rules for submitted credentials.
However the application itself must be protected by form-based authentication (steps 1.1.1 and 1.1.2)
1.2.1 Define Basic Authentication in Policy Manager
Go to the Access Manager GUI: http://hostname:port/access/oblix and click the Access System Console link, login with the administrator account.
Access System Console > Access System Configuration > Authentication Management
Click button Add to create Basic Authentication.
Fill in the entries like this:
(pay attention:
Name: COREidSSONoPwd (choose freely)
Description: Authentication without Password (choose freely)
Level: 1
Challenge Method: Basic
Challenge Parameter: realm:NetPoint Basic Over LDAP
SSL Required: No
Challenge Redirect
Enabled: Yes

1.2.2 Configure the credential_mapping Plug-In for Basic Authentication
Now you have to configure the credential_mapping plugin_in for form-based authentication.
Click on tab plugin and click the button add.
First configure the credential_mapping (this is important, if password is the first plugin it will not work) select the plugin in the drop down box.
For Plugin Parameters:
obMappingBase="cn=users,dc=us,dc=oracle,dc=com",obMappingFilter="(&(&
(objectclass=inetorgperson)(uid=%userid%))(|(!
(obuseraccountcontrol=*)) (obuseraccountcontrol=ACTIVATED)))"
The value for uid must match the variable specified for user name in the login1.html form and in the creds part of the Form Based Authentication.
This also corresponds to the value of the coreid.name.attribute option in the Oracle Access Manager login module configuration.

1.3 Configure the Resource Type
In Oracle Access Manager, a resource type describes the kind of resource to be protected, including its associated operations. Operations associated with a resource are tied to its type. You must configure an Oracle Access Manager resource type for your resource, and then protect your resource type, action URL, and application.
The Oracle Access Manager login module will need information for the resource type, as will be noted. OC4J uses the resource type to retrieve user information based on the Oracle Access Manager ObSSOCookie or the user name, using APIs of the Access Manager SDK.
1.3.1 Configure the Name and Operation of the Resource Type
Access System Console > Access System Configuration > Common Information Configuration > Resource Type Definitions
On the page that lists all resource types, choose to add a new resource type.

Make entries such as the following to define a new resource type:
Resource Name: myresourcetype (choose freely)
Display Name: myresourcetype (choose freely)
Resource Matching: Case Insensitive
Resource Operation: MYRESOURCEOPERATRION (choose freely)
You can choose any names for the resource type and resource operation, but you must use the same names for the coreid.resource.type and coreid.resource.operation option values in the Oracle Access Manager login module configuration.
1.3.2 Configure and Protect the URL of the Configured Resource Type
After authentication, OC4J requires access to the user's roles in order to check for authorization. To enable this, you must set up an Oracle Access Manager "return action" that allows Oracle Access Manager to return the appropriate roles to OC4J for the user after successful authentication.
To set up the return action in Oracle Access Manager, navigate as follows:
Policy Manager > Create Policy Domain

Policy Manager > My Policy Domains > myresourcetype > tab Resources
Create Resource for myresource type
Click button Add

Resource Type: myresourcetype (step 3.1)
Host Identifiers: hostname (step 1.5)
URL Prefix: /myresourceurl (choose freely)
Description: (choose freely)
Button Save
The URL prefix must start with a "/" and is the designated URL of the resource type. This must match the value of the coreid.resource.name option in the Oracle Access Manager login module configuration.
1.3.3 Configure the Return Action Attributes
After authentication, OC4J requires access to the user's roles in order to check for authorization. To enable this, you must set up an Oracle Access Manager "return action" that allows Oracle Access Manager to return the appropriate roles to OC4J for the user after successful authentication.
To set up the return action in Oracle Access Manager, navigate as follows:
Policy Manager > My Policy Domains > MyResourceType > Authorization Rules tab
Click button Add
Name: MyResourceType (choose freely)
Description (choose freely)
Enabled Yes
Allow takes precedence No
Click button Save

Under the Authorization Success tab section, add the following entries (continuing the preceding example using myresourcetype):
Return Type: myresourcetype
Return Name: myresourcetype
Return Attribute: ObMyGroups

1.4 Protect the Action URL
Create Resource for http type action url (/oam/access/test.html)
Policy Manager > My Policy Domains > myresourcetype > tab Resources
Create Resource for myresource type
Click button Add
Resource Type http
Host Identifiers hostname (step 1.5)
URL Prefix /oam/access/test.html action URL in login1.html
Description (choose freely)

IMPORTANT:
Do not forget to enable the policy:
My Policy Domains > MyResourceType > General
Click modify
Set Enable to Yes and click save.

Overview:

2. Configure OC4J with the Access Manager SDK
After that the SDK is installed the SDK needs be registered against the Access Server and the already installed WebGate. Pay attention the order of configuring is important. First the Access Server then the WebGate.
Configure SDK against Access Server:
Go to the directory
cd SDK_HOME/AccessServerSDK/oblix/tools/configureAccessGate
./configureAccessGate -i /SDK_HOME/AccessServerSDK/ -t AccessGate -w NAME_WEBGATE -m open -S -P PASSWORD -h ACCESS_SERVER_HOSTNAME -p ACCESS_SERVER_PORT -a ACCESS_SERVER_NAME
Output:
Preparing to connect to Access Server.  Please wait.
AccessGate installed Successfully.
Configure SDK against WebGate:
./configureAccessGate -i /SDK_HOME/AccessServerSDK/ -t AccessGate -w SDK_NAME -m open -S -P PASSWORD -h HOSTNAME_WEBGATE -p ACCESS_SERVER_PORT -a ACCESS_SERVER_NAMEOutput:
Preparing to connect to Access Server.  Please wait.

AccessGate installed Successfully.
2.1 Configure the Access Manager SDK to Each OC4J Instance
You will need Oracle Access Manager SDK, one installation for each OC4J instance, on the same system as OC4J. The Access Manager SDK is required by OC4J at runtime to communicate with Access Server. OC4J must be given the Access Manager SDK location during startup (through the java.library.path property), so that it can initialize the SDK. Note this initialization occurs only if at least one application is using Oracle Access Manager as the security provider.
2.1.1 Copy jobaccess
Copy the Oracle Access Manager file jobaccess.jar from the Access Manager SDK to the OC4J path. You will find this file in the SDK_HOME/AccessServerSDK/oblix/lib directory. Create the directory ORACLE_HOME/j2ee/home/lib/ext (if it does not already exist) and copy the jobaccess.jar to that directory.
2.2 Configure the Access Manager SDK Library Path for Each OC4J Instance
Configuring opmn.xml for Oracle Access Manager
Where OC4J is managed by OPMN, add settings to opmn.xml for Oracle HTTP Server and OC4J, as follows, when you use Oracle Access Manager:
1. Set the LD_ASSUME_KERNEL environment variable to the value "2.4.19".
2. Set the LD_LIBRARY_PATH environment variable to point to the AccessServerSDK library path.
3. Add the AccessServerSDK library path to java.library.path as a start parameter.
Then restart the OC4J instances.
Following is an opmn.xml example for the OC4J home instance. Repeat these settings for the OC4J_SOA instance and any other OC4J instances as appropriate:
<ias-component id="OC4J">
   <process-type id="oc4j_callerinfo" module-id="OC4J" status="enabled">
      <environment>
         <variable id="LD_ASSUME_KERNEL" value="2.4.19"/>
         <variable id="LD_LIBRARY_PATH"
                value="/SDK_HOME/AccessServerSDK/oblix/lib" append="true"/>
      </environment>
      <module-data>
         <category id="start-parameters">
            <data id="java-options" value="-server ...
                  -Djava.library.path=/SDK_HOME/AccessServerSDK/oblix/lib
                  ... />
         </category>
         ...
      </module-data>
      ...
   </process-type>
   ...
</ias-component>
3. Configure the CallerInfo Application
3.1 Protect the Application URL's in web.xml
The first step in protecting your application is to protect appropriate URLs or URL prefixes through settings in the web.xml file, using standard J2EE features.
These are the same URLs that you will you protect through Oracle Access Manager.
And add the following code:
    <login-config>
        <auth-method>BASIC</auth-method>
    </login-config>
3.2 Settings for Application Deployment
In Oracle Application Server 10.1.3.x implementations, Application Server Control does not yet support Oracle Access Manager as a security provider. When you deploy your application using the Application Server Control Console, choose the file-based provider. This will be overridden through the configuration steps documented in this blog.
3.3 Configure Oracle Access Manager SSO in orion-application.xml
To use Oracle Access Manager Single Sign-On as the authentication method for Web applications, set the auth-method attribute to "COREIDSSO" in the
<jazn provider="XML" default-realm="jazn.com" jaas-mode="doAsPrivileged">
   <jazn-web-app auth-method="COREIDSSO"/>
</jazn>
You also need to add the mapping between de application role and the OID group:
<!-- mapping for realm "jazn.com" -->
<security-role-mapping name="sr_manager">
     <group name="managers" />
</security-role-mapping>
<security-role-mapping name="sr_developer">
    <group name="developers" />
</security-role-mapping>
3.4 Protect the Application URL's in Oracle Access Manager
Policy Manager > Create Policy Domain
Name : callerInfoB
Description: callerInfoB
Click button save

Tab Resources
Resource Type http
Host Identifiers hostname
URL Prefix /callerInfo/callerInfoB
Description caller info B (choose freely)
Click button Save

Tab Authorisation Rules > SubTab General
Name Everyone (choose freely)
Description Everyone (choose freely)
Enabled Yes
Allow takes precedence No
Click Save

Tab Authorisation Rules > SubTab Allow Access
Role Any one
Click Save

Tab Default Rules > SubTab Authentication Rule > SubSubTab General
Name: Form Login
Description: Form Login
Authentication Scheme: COREidSSOform

Tab Default Rules > SubTab Authorization Expression > SubSubTab Expression
Select Authorization Rule: Everyone
Click button Add > Click button Save

IMPORTANT:
Do not forget to enable the policy:
My Policy Domains > CallerInfoB > General
Click modify
Set Enable to Yes and click save.

3.5 Configure the Oracle Access Manager Login Module
For a Web application, the OC4J implementation to support Oracle Access Manager requires the login module CoreIDLoginModule, supplied by Oracle. The following template shows the general form of the configuration, in the system-jazn-data.xml file.
$ORACLE_HOME/j2ee/CONTAINER_NAME/config/system-jazn-data.xml
<application>
  <name>callerinfo</name>
    <login-modules>
      <login-module>
         <class>oracle.security.jazn.login.module.coreid.CoreIDLoginModule</class>
           <control-flag>required</control-flag>
             <options>
               <option>
                 <name>coreid.password.attribute</name>
                 <value>password</value>
               </option>
               <option>
                 <name>coreid.name.attribute</name>
                 <value>userid</value>
               </option>
               <option>
                 <name>addAllRoles</name>
                 <value>true</value>
               </option>
               <option>
                 <name>coreid.resource.operation</name>
                 <value>MYRESOURCEOPERATION</value>
               </option>
               <option>
                 <name>coreid.resource.type</name>
                 <value>myresourcetype</value>
               </option>
               <option>
                 <name>coreid.resource.name</name>
                 <value>/myresourceurl</value>
               </option>
               </options>
            </login-module>
        </login-modules>
    </application>
3.6 Test the application
WebGate will intercept this request and will check the authentication scheme for this URL. The configuration shown earlier in this chapter will result in the user being prompted with the login.html login form from "Create a Login Form". Then the following sequence will take place:
1. WebGate will capture the user name and password from the login form and communicate to Access Server.
2. Access Server will communicate to Oracle Internet Directory (or other LDAP repository that you use).
3. After the user is authenticated, the Oracle Access Manager SSO token will be returned to WebGate.
4. WebGate will set the ObSSOCookie and pass the cookie and other HTTP headers to mod_oc4j, which will route the request to the appropriate OC4J instance.
5. OC4J will take the cookie and validate it, or retrieve roles for the user associated with this cookie from Access Server using the Access Manager SDK configured on OC4J.
http://hostname:port/callerInfo
Application:

Click on the link for managers: callerInfoB
Login screen (login1.html):
Login as manager/password

Application shows roles:

Refers:
http://download.oracle.com/docs/cd/B31017_01/web.1013/b28957/coreid.htm#BJEBJCCF
Did this post help you in any way can you please leave a comment? This will motivate me writing more posts.
Monday, March 23, 2009
WebGate version and patches, Netpoint/Oblix/CoreId/Oracle Access Manager
It is possible to retrieve the version and patches for Oracle Access Manager components:
For Access Server:
Login on the web interface:
http://hostname:portnumber/access/oblix
Click on Access System Console link, log in with an administrator user, click on the about link in the upper right corner and then on the button View System Info.
For WebGate
Look in the directory $ACCESS_INSTALL_DIR/access/oblix/config there is an file npXX_wg.txt. In this file there is an Release entry with the patch number.
For Access Server:
Login on the web interface:
http://hostname:portnumber/access/oblix
Click on Access System Console link, log in with an administrator user, click on the about link in the upper right corner and then on the button View System Info.
For WebGate
Look in the directory $ACCESS_INSTALL_DIR/access/oblix/config there is an file npXX_wg.txt. In this file there is an Release entry with the patch number.
Subscribe to:
Posts (Atom)


![[Valid Atom 1.0]](https://blogger.googleusercontent.com/img/b/R29vZ2xl/AVvXsEiwsk0jkCpg60orkOvHQLaU5Kfnb72Q4Fv59o0rzOSTRknWzbGrBmh31ZjGOZdIt4C_wLVtBkWfFwG5eMfJQQ1E7MlTWYYZhWtFG6ndJemCWSu5DypAo_UP6u1Y20xCR_N-ksYP5OzvrUkE/s400/valid-atom.png "Validate my Atom 1.0 feed")

 Posts
Posts

